I hope everyone has had as much fun this summer as I have!
Our summer started out dry. I mean Really Dry!!! But I planted my garden with the best of intentions. Unfortunately, it didn’t take long to realize I was watering twice a day and the plants were still dying. When the rains finally did come we received over 3″ in one evening and enough hail to pound what was left of the garden into the ground. So I surrendered the outside gardens to Mother Nature and started working instead on the plants in the hoop house and Nadine, one of my campers. She is a 20 foot, 1972 Nomad and was the first camper I bought when this madness began. She has patiently waited in the tall grass for a couple of years while I worked on another camper but last fall I went a little crazy and gutted her. Avacodo Green and Harvest Gold rom the ’70’s just doesn’t do it for me. Torn apart and empty she spent last winter behind our house till spring hit and I started work. After 3 months of rebuilding she’s still not finished but I have already taken her camping twice and she has performed flawlessly.
This picture was taken the day I bought her for $250.00 – warts and all.

Now she looks like this:

Quite the change isn’t it? I patched & sealed the holes on the outside and removed the windows so she could be primed and painted. The broken and unused vents in the roof have been replaced or sealed off and she’s gotten a new coat of roof sealant to keep out that pesky water. Next I cleaned and repaired the windows, then resealed and reinstalled them. She received a new ‘skirt’ of mini galvanized tin to hide the flaws around her bottom half, an air conditioner, a new jack and new lights all around. Morgan painted her (we used tractor paint – sprayed on) then spent two weekends rewiring the whole unit, moving light fixtures & plug-ins, fixing the brakes and checking the wheel bearings.
My hubby, bless his heart, helped by offering to hitch it up and drag it to the dump every other day. He has since changed his tune.
Here’s a photo of one of the clearance lights – just because I think they look bad-ass. Bahahahahaha!

The inside changes were pretty drastic too. The paneling was ripped out and the rotten wood was replaced. The propane system was completely removed because the fridge and furnace didn’t work and I never used the stove anyway so why keep it? I bought a new electric fridge, a toaster oven and a cute little electric heater to take their place.
Every leak was sealed and triple checked before the first piece of pink foam insulation was added.

The walls are a combination of pine bead board and 1/4″ plywood. The cabinets, as you can see, are made from old weathered boards which I stole from the fence around our yard. Hubby never even noticed until he stuck his head into the camper and said, “Where’d you get that wood?” Ha! The cabinets still need latches and handles but I love them. The platform under the fake wood stove (aka – electric heater) is built over the wheel well and contains beautiful Mexican tiles left over from another project. On the left you can also see a little bit of the bathroom and the hanging door hung on a piece of galvanized pipe with large eye bolts as the hardware. It slides a little hard but that’s OK as the door isn’t moving around while we’re traveling. To the right, just out of the photo is the new fridge.
The countertop is a collection of sea shells I gathered on several trips. I also added a few fishing flies, an old bottle with a message in it, and a few other items before covering it with a pour-on resin. The odd rectangular hole in the counter top is where the sink (an old enameled wash basin) will eventually be. The very large picture on the counter was there just to hide the breaker box and to ‘dress the old girl up’ a little for her first trip with the Sisters on the Fly. The event which was held last month at Red Lodge, Montana.

The other side has storage for folding camp chairs, fishing poles, supplies and maybe someday an awning. Plus there’s room for a comfy chair and some artwork that swings opens like a wall safe and will double as my jewelry box – once it’s finished.

The floor which was covered with nasty stick-on linoleum tiles was removed and the subfloor was covered with a new layer of underlayment before getting a Kraft paper finish which I’d seen on Pinterest. Thank goodness for Pinterest!!! This floor was simple and fun to do and I am seriously considering doing this in my sewing room this winter! You rip up chunks of paper, crumple them then dip them into a mixture of 50% Elmer’s glue and 50% water, squeeze out the excess then smooth the wet paper out on the floor. After allowing the paper to dry, I stained and sealed it with at least 6 coats of polyurethane. It cost about $17 in supplies.
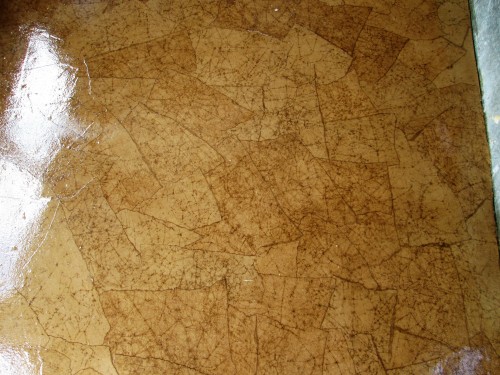
Finished, it reminds me of old parchment. This flooring is very forgiving. You can sand down any parts that curled up or add more paper if needed and if it gets scratched you give it another coat of polyurethane. Sweet!!!
The next photo is the front of the camper. The curtains are the ones that were in the camper before so they will eventually be replaced with something more appropriate to her make-over. There was only 48″ for the width of the bed before it would hang over the doorway at the foot so I purchased a full-sized 6″ memory foam mattress and cut it down with a serrated bread knife. I will eventually build pull out drawers under the bed to hide the mess and hold my Dutch oven and other supplies. The drawer fronts will be more of the gray wood (it’s still on the fence as I write this – Haha!). Since I decided to move the fresh water storage tank out onto the trailer hitch where the propane bottles used to sit the drawers should be about 45″ deep for lots of good storage. Dalton has built me a metal bracket to hold the tank that I can cover with the leftovers of corrugated tin.

The tin on the front (and back) walls of the camper were attached so that the center section can be removed to gain easy access to the front and back clearance lights. Just in case…

This isn’t a very good picture of the bathroom but you can see that the shower, which was on the right side has been removed. It leaked like a sieve so I was happy to rip that out. The plumbing lines are behind a hidden access door in the left wall and they will be run through to an outdoor shower – once I get started on the water system. The black cabinet is screwed to the wall and soon there will be a rounded wooden door on the cabinet under the sink. It all takes time. The sunflowers in the corner are just stored there when I travel. Once I’m set up they are hung under the windows on the side and back of the trailer.
One of my favorite parts of the whole rebuild is the ceiling.

Since I didn’t want to pay big money for real tin ceiling tiles I purchased foam ones from a website called Decorative Ceiling Tiles. These were $4.00 each but of course I have since seen them on sale for $2. I painted them with chalk paint, highlighted the design with a swipe of a sponge dipped in metallic silver paint then added a coat of clear wax with dark wax on top. Once I glued them to the ceiling I sprayed them with a layer of clear lacquer that gave them a shiny finish.
I originally had plans for large silver decals on the sides but Morgan wasn’t sold on the idea and since he did help so very much with this project and would occassionally like to take it camping too I agreed to leave her the way she was – except for the one on the back. I think every girl needs at least one ‘tattoo’.
Happy Trails…

